CAD entry 1
Objectives:
- tasked to revise our FUSION 360 CADD skills.
- show how to create a CAD fusion 360 keychain
-------------------------------------------------------------------------------------------------------------
To recap, from ICPD:
- Computer Aided Design & Drafting is using softwares to draw and design physical components of a product or to layout processes while saving time and effort. Additionally, this software allows us to accurately calculate dimensions and measurements when designing a product.
- Fusion 360 is an all-in-one tool that connects the entire product development process comprising many areas such as design to manufacturing.
- (source: Group 2 [my group] ICPD Blog, Week 7)
How to create your FUSION 360 Keychain Design
Follow this step-by-step manual to create your very own keychain design which can be 3-D printed! It has been broken down to the very basics (thats why its 31 steps) all you have to know is how to read and understand English!
----------------------------------------------------------------------------------------------
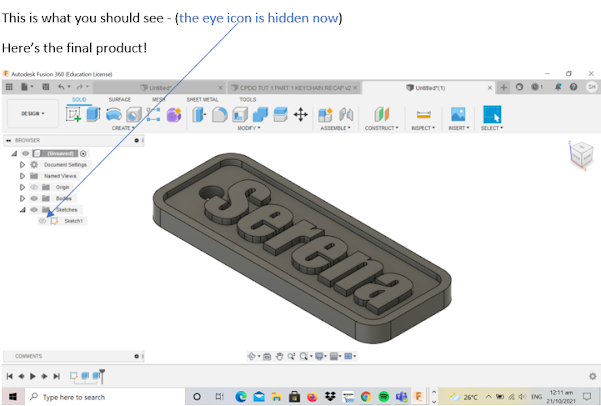
What to expect - End look of the keychain :

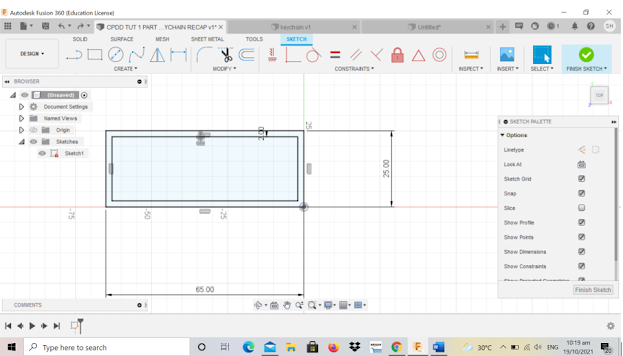
Step 1: Open Fusion 360 App. This is what I see:

Step 2: Click ‘Create’ as shown by the blue arrow below:

Step 3: Then click “Create Sketch” (see red circle) and click anywhere on the grid:


You will see this:

Step 5:
Click and Drag your mouse anywhere on the grid to form a
rectangle as shown below:

Step 6:
Now that you have a rough sketch of a rectangle, you need to
ensure the dimensions are “65 by 25mm” by simply typing the correct dimensions
in the boxes (see blue circles) above the length and breadth (shown in the blue
circles) for easier navigation between both boxes, click the “Tab” key on your
keyboard while doing so:

This is what you should see:

Step 7: Click the offset icon (shown in the red circle)

Step 8: Click on the outline of the rectangle and then type in ‘2mm’ in the box (see red circle) to offset. [This creates an inner smaller rectangle as there is a border of 2mm created.]

This is what you will see:
Step 9: Click the ‘Fillet” icon (See red circle):
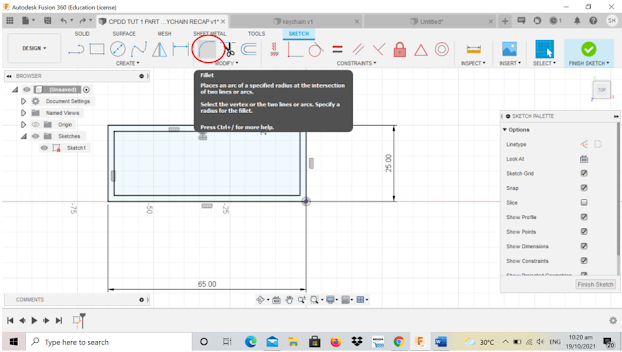
Step 10: Click the 4 outer corners of the rectangle. [This
curves the 4 corners of the rectangle i.e. your keychain base to give a better
visual appeal 😊]

Step 11: After all 4 corners have been “ fillet-ed”, type
into the box (see red circle) “5mm”.

This is what you will see:

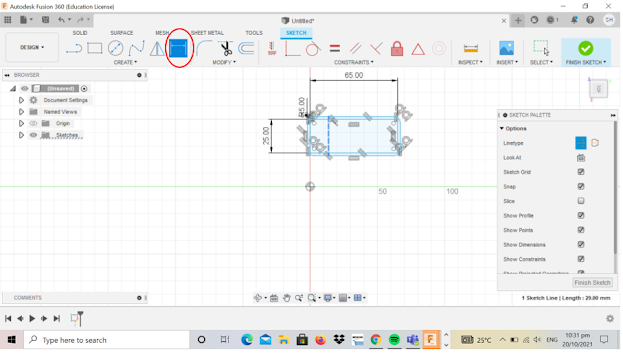
Step 12: Click on the line icon (See red circle)

Step 13: Create the line by dragging the ‘X’ (See red
circle) from the top of the rectangle downwards from the top outer length of
the rectangle to the bottom outer length (see green arrow).
![]()

This is what you should see - the line you’ve just created
inside the rectangle:

Step 14:
Right click on the line you just created and click “Normal/Construction”
(See red circle):

This is what you should see – the line now becomes dotted:

Step 15: Now Select the Sketch Dimension icon (red circle)
Step 16: Click on the outer breadth of the rectangle and the line you created - (see darker blue lines)

Step 17: In the box that appears (see red circle), type in ‘7mm’

This is what you should see:


This is what you should see – point created (see red
circle):


Step 20: Type “5mm” in the box (see red circle):

This is what you should see:

Step 21: Click the “text’ icon (see red circle)

Step 22: Click on a point in the inner rectangle from which
you should see this:
Then type your name inside the box (see red circle), select ‘impact’
as the font (see green circle) and adjust the height to fit your rectangle (see
purple circle):


Step 23: Click and Drag on your name to centre it
accordingly
It should look like this:

Step 24: Click “finish sketch” (red circle)

It should look like this now:

Step 25: Click on the outer layer and the inner rectangle
[for ease whilst doing so hold onto ‘shift tab’ on your keyboard] (DO NOT CLICK
THE HOLE)

Step 26: Extrude to 3mm (see red circle)

This is what you should see:


Step 28: Show all sketches by clicking on the arrow (red circle) of ‘Sketches’ and click on the eye (green circle) of ‘Sketch 1” to show the sketch.


Step 29: Click on the border and your name, then select extrude icon (see red circle) and type “1.5mm’ in the box (see green circle)

Step 30:


This tutorial was mainly meant to be a CAD refresher session, whereby I was tasked to recreate a keychain, which was something we did in ICPD as well. The purpose of recreating the keychain was to let us practice our Fusion 360 skills again as after the long semester break many of us would have lost touch with the software.
This activity is important as learning how to design and draw using a CAD software will be a crucial skill we need for this module, spiraling into our FYP module as well. This session was fun as I often found myself laughing at how crusty i still was at the software however at the end when i managed to create the desired product i.e. keychain i felt very proud and i even rewarded myself with a nice dinner - pizza!! Anyway, as briefly mentioned earlier, this skill will be very useful for us specifically in this module, we are required to learn laser cutting and execute it by cutting a physical product and that itself needs preparation using Fusion 360. More importantly, we will also be making our own chemical product whereby we would use Fusion 360 to design it.
After reflecting, I used to think that CAD software is hard especially for me since I am not very tech-savvy and usually take 3x longer than an average person to be familiar with something tech related . However, after ICPD and getting exposed to Fusion 360 again, I realized that the software was fun and not as hard as i thought especially with more practice. Now I think that designing on Fusion 360 is useful and i've gained more confidence in using it that my fears of being unable to use it have been eased. So next I will implement this skill I have brushed up on for this module, and will seek to continue practicing and getting better at it in a bid to achieve one of my personal goals (See home page).

Comments
Post a Comment